Showing posts with label patterns. Show all posts

Wednesday, January 07, 2009

It is a truth universally acknowledged that cancer can suck it


This is Kate:

IMG_0042


She's pretty fuckin' awesome. I can't even tell you how much. So when she told me that her grandfather's cancer had returned, I reacted as knitters react: I asked myself what I could knit for him. Being all sneaky-style as I am, I asked Kate if her grandfather had a shoe size, what shoe size he would have. Then a day later I asked her what his opinion was on the F-bomb.

Being also fucking clever, she replied that he would be totally down with a pair of socks that might happen to say "Fuck Cancer." That was good enough for me. A few days later I had these:

IMG_0284.JPG


Someone asked me for the pattern, and I figured that since I was writing it up I may as well post it here. Make 'em for your loved ones, or your liked ones, or people you haven't even met yet.

Caveat Knitter: I haven't test knit this pattern. But the most important part is the chart, so use it as you will.

Cancer Can Suck It (Socks)

Yarn:
MC: 352 yds sport weight wool (I used 2 balls Lana Grossa Cool Wool 2000 with exactly enough for a 10.3” foot – approx. a man’s size 9)
CC: Not much sport weight wool (I used 1 ball Lana Grossa Cool Wool 2000 and had lots left over)

Needles:
Size 3 for the ribbing, 4 for stockinette. I knit pretty loosely, so you may have to go up a size for each.

Gauge: 6.5 stitches per inch in stockinette

Top ribbing:
Using size 4 needles cast on 52 stitches
Switch to size 3 needles, join in the round being careful not to twist
K2p2 around for 18 rows

Leg:
Switch to size 4 needles
Work plain around for 10 rows
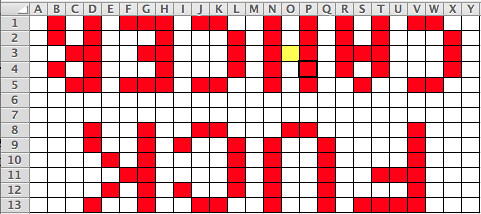
Start fair isle lettering.

When you get to the yellow stitch: Pick up left leg of stitch below and to the right -- the one with the thicker border -- and knit that leg together with your next stitch. 


Work plain for 19 rows (or desired length)

Heel (feel free to substitute your own):
Working over half the stitches:
Row 1: *sl1, k1 repeat from * to end of row
Rows 2 and 4: sl1, purl to end
Row 3: sl1, *sl1, k1, repeat from * to last stitch, k1

Repeat until the heel flap is 2.3” ending with a purl row

K15, ssk, k1, turn work
sl 1, p5, p2tog, p1, turn work
Row 1: sl1, K to 1 stitch before gap, ssk, k1, turn work
Row 2: sl1, P to one stitch before gap, p2tog, p1, turn work

Repeat those two rows until all stitches on the heel have been worked, ending with a purl row.

Gusset:

Knit across heel flap, pick up 16 stitches on the side of the heel flap. Place marker. Knit across the top of the sock, place marker. Pick up 16 stitches on the heel flap.

Row 1: Knit to 3 stitches before marker, k2tog, knit to next marker, k1, ssk, work to end
Row 2: Work plain.

Repeat two rows until you’re back down to 52 stitches.

Foot:
Remove markers and work plain until the sock is 1.25” from being the final length.

Toe:
Switch to CC.

K26, place marker, k26, pm

Row 1: *k1, ssk, k to 3 before marker, k2 tog, k1, repeat from * to end
Row 2: Work plain

Repeat both rows until you have 24 stitches left (total). Graft toe closed.

IMG_0287.JPG

Saturday, October 11, 2008

Scandihoovian hat


IMG_0469.JPG


Gauge: 2 stitches per inch
Needles: Size 13 DPNs (I used a circ, and it was painful because it was too small for magic loop).
Yarn: Blue Sky Alpaca Bulky Natural, 1 skein (45 yards, with plenty leftover for a nice, optional pom pom)
Size: 1 year (your mileage will TOTALLY vary. My nephew is 4.5 months and giant and this hat just fits him).
Notes: My increase was knit-into-the-stitch-below. It doesn't really matter which you use.

IMG_0465.JPG


C/O 6 (I used Emily Ocker's Circular Cast-on). Place marker at beginning of round.

Row 1: *K1, m1, repeat from *
Row 2, and all even rows: Knit around
Row 3: *K2, m1, repeat from *
Row 5: *K3, m1, repeat from *

Continue until you have 30 stitches total, ending with an even row.

Next row: Increase 4 stitches evenly.

Knit plain until the whole hat measures 6.25".

Next row: K7, wrap and turn (w&t)
Next row: P7, w&t
Next row: K to 1 stitch before wrapped stitch, w&t
Next row: P to 1 stitch before wrapped stitch, w&t

Repeat until you have one stitch unwrapped, ending with a WS row.

Next row: K4, picking up wraps, K13, w&t
Next row: P7, w&t
Next row: K to 1 stitch before wrapped stitch, w&t
Next row: P to 1 stitch before wrapped stitch, w&t

Repeat until you have one stitch unwrapped, ending with a WS row.

Bind off loosely, picking up wraps as you get to them. Add braids at the end of the ear flaps. Add pom pom to the top, if that's your cup of juice.

IMG_0463.JPG

Sunday, July 06, 2008

Unders, size XL


“The sock yarn I found there was so lovely that if you had told me that angels flew it down from heaven twice a week to try and make up for poison ivy, I would consider that a reasonable explanation. It is so beautiful and soft that I would not hesitate (except for the nagging concern that people would think I was a raving lunatic) to knit it into underpants.”

- Stephanie Pearl-McPhee, Yarn Harlot: The Secret Life of A Knitter


I think all knitters have felt yarn that demands to be made into something that goes right on one’s happy place (I don’t think Lorna’s Laces shepherd sport really qualifies, but work with me here). And UNlike Mme Harlot, I have no major qualms with people thinking I’m a raving lunatic, since what with the obsessive knitting and the obsessive contra dancing, I’m probably not too far off anyway.


Plus, I thought that knitted underwear would be awesome anyway. And they are. Remember the feeling you got when you put on your first pair of hand knit socks? It’s like that, but better.


The written pattern’s kind of ugly and sketchy, and it only comes in one size because I have NO IDEA how to change the size on something with so picky a decrease. But hey! It’s free!

If you’re smaller than me, you can use a lighter weight yarn and smaller needles.

Gauge: 6 stitches, 11 rows to the inch

I used:
Needles: size 2 circs for the body and size 3 for the i-cord
Yarn: Lorna's Laces Shepherd Sport, 1 ball and a smidge (around 50 extra yards).

Your mileage will probably vary. Rav link to mine.

Also needed:
- Embroidery needle
- Enough 1/4" elastic to go around your hips. I bought about a yard and that was fine.
- Some thinner elastic for around your legs. 1/8" or so works.

Waist:
Provisionally cast on 220, join, being careful not to twist

Knit 5 rows
6: k2tog, yo to end
knit 5 rows

Knit next row together with cast-on row. Ta da! Picot edge!

Knit in stockinette for an inch.

Back:
Over 110 (half the total) stitches:

IMPORTANT NOTES: All instructions are for right side rows. Wrong side rows are just purled. When you see two dashes (--) it means the right side row is knit plain. It’s good to slip the first stitch of each row for a selvedge (ignore this if you’re binding off stitches at the beginning of the row). This’ll make it easier to pick up stitches for the I-cord edge.

1: b/o 4 either side
2. b/o 1, ssk, k to last 4, k2tog, k next, pass last st over knitted st
3. sl 1, ssk, knit to last 3, k2tog, k1
4. sl 1, ssk, knit to last 3, k2tog, k1
5. sl 1, ssk, knit to last 3, k2tog, k1
6. sl 1, ssk, knit to last 3, k2tog, k1
7. sl 1, ssk, knit to last 3, k2tog, k1
8. sl 1, ssk, knit to last 3, k2tog, k1
9. --
10. sl 1, ssk, knit to last 3, k2tog, k1
11. sl 1, ssk, knit to last 3, k2tog, k1
12. --
13. sl 1, ssk, knit to last 3, k2tog, k1
14. --
15. sl 1, ssk, knit to last 3, k2tog, k1
16. --
17. --
18. sl 1, ssk, knit to last 3, k2tog, k1
19. --
20. --
21. sl 1, ssk, knit to last 3, k2tog, k1
22. --
23. sl 1, ssk, knit to last 3, k2tog, k1
24. --
25. --
26. sl 1, ssk, knit to last 3, k2tog, k1
27. --
28. --
29. sl 1, ssk, knit to last 3, k2tog, k1
30. --
31. --
32. sl 1, ssk, knit to last 3, k2tog, k1
33. --
34. --
35. sl 1, ssk, knit to last 3, k2tog, k1
36. --
37. --
38. sl 1, ssk, knit to last 3, k2tog, k1
39. --
40. --
41. sl 1, ssk, knit to last 3, k2tog, k1
42. --
43. --
44. sl 1, ssk, knit to last 3, k2tog, k1
45. --
46. sl 1, ssk, knit to last 3, k2tog, k1
47. –
48. --
49. sl 1, ssk, knit to last 3, k2tog, k1
50. sl 1, ssk, knit to last 3, k2tog, k1
51. b/o 1, ssk; k to last 4, k2tog, b/o 1
52. b/o 1, ssk; k to last 4, k2tog, b/o 1
53. b/o 1, ssk; k to last 4, k2tog, b/o 1
54. b/o 1, ssk; k to last 4, k2tog, b/o 1
55. b/o 1, ssk; k to last 4, k2tog, b/o 1
56. b/o 1, ssk; k to last 4, k2tog, b/o 1
57. --
58. sl 1, ssk, knit to last 3, k2tog, k1
59. --
60. sl 1, ssk, knit to last 3, k2tog, k1
61. --
62. sl 1, ssk, knit to last 3, k2tog, k1
63. --
64. sl 1, ssk, knit to last 3, k2tog, k1
65. --
66. sl 1, ssk, knit to last 3, k2tog, k1
67. --
68. --
69. --

Front:
1. b/o 3 on both sides
2. b/o 3 on both sides
3. b/o 3 on both sides
4. b/o 3 on both sides
5. b/o 3 on both sides
6. b/o 3 on both sides
7. b/o 3 on both sides
8. b/o 3 on both sides
9. b/o 3 on both sides
10. sl 1, ssk, knit to last 3, k2tog, k1
11. sl 1, ssk, knit to last 3, k2tog, k1
12. sl 1, ssk, knit to last 3, k2tog, k1
13. sl 1, ssk, knit to last 3, k2tog, k1
14. sl 1, ssk, knit to last 3, k2tog, k1
15. sl 1, ssk, knit to last 3, k2tog, k1
16. sl 1, ssk, knit to last 3, k2tog, k1
17. sl 1, ssk, knit to last 3, k2tog, k1
18. sl 1, ssk, knit to last 3, k2tog, k1
19. sl 1, ssk, knit to last 3, k2tog, k1
20. sl 1, ssk, knit to last 3, k2tog, k1
21. sl 1, ssk, knit to last 3, k2tog, k1
22. sl 1, ssk, knit to last 3, k2tog, k1
23. sl 1, ssk, knit to last 3, k2tog, k1
24. sl 1, ssk, knit to last 3, k2tog, k1
25. sl 1, ssk, knit to last 3, k2tog, k1
26. sl 1, ssk, knit to last 3, k2tog, k1
27. sl 1, ssk, knit to last 3, k2tog, k1
28. sl 1, ssk, knit to last 3, k2tog, k1
29. sl 1, ssk, knit to last 3, k2tog, k1

Kitchener two sides together.

Using size 3 dpns or circular needles, I-cord around the leg holes. Note: be generous when you’re I-cording. Pick up more rather than fewer stitches – I-cord doesn’t stretch.

Use the 1/4” elastic to measure around your hips and mark the end. Don’t stretch the elastic when measuring. Lace through the picot edge, overlap the elastic by about an inch, and sew together, being careful not to twist.

Use the 1/8” elastic to measure around your leg and mark the end. Don’t stretch the elastic when measuring. Lace through the I-cord. This can be tricky. Sorry. Overlap the elastic by about an inch, and sew together, being careful not to twist. Repeat for other leg.

Weave in ends. Put on. Prance around.

Tuesday, July 31, 2007

Addicted...


...to quick-finish projects.

It started so innocently, with these (pdf):


And then I got some noro and a bar of soap and made a scrubby*:


I couldn't stop. The booties -- they were too cute! I had to make more:


...can't... stop... making baby booties... so... teeny...


...I cast on for another pair last night...

*Scrubby ingredients:
Noro Kureyon, size 5 circular needle (or 5 size 5 dpns, or whatever gets you about 4 stitches per inch, embroidery needle, bar of soap

Recipe:
C/O 12, work 7 rows in stockinette
Pick up 3 stitches on short side of rectangle, 12 on the far side, and 3 on the other short side.
Work seed stitch in the round until the soap fits inside the bag.
Cast off 18 (one short side, one long side, one short side).
Work remaining 12 stitches in stockinette for 7 rows, bind off.
Insert soap, sew bag closed.

Monday, March 05, 2007

Taking a break


The sweater keeps getting bigger, the rows get longer, and I need to... not look at it for a few days.

And the arch-shaped socks? I'm not... entirely positive where they are right now. No, seriously. I think they're in my bookbag from St. Croix... Maybe?

I started some mittens with some Jo Sharp Alpaca Kid Lustre in deep maroon. Not sturdy, but will keep me warm on the way to the car in the mornings. It's going fairly quickly, which is kind of exciting. No pictures yet. Soon, though! I'm thinking that since they're simple I may embroider them a la Lene. (She talks about her methods here).

I also picked up a half-finished handkerchief and finished it up:


(I need to fuss with my camera controls. BOY is that noisy).
(Okay, I'm just excited that I know what that means).


I got some use out of the previously finished one while I was sneezing and snurking through my post-vacation cold, and here are my conclusions:

So much better than the paper towels I'd been using at work. So much better. Of course, so is fine-grade sandpaper, but these made my nose happy.

Pattern for super nose protection (though you hardly need one):

-1 skein KFI Patagonia Nature Cotton makes two handkerchiefs with a smidge left over.

-Size 5 needles (though I tend to knit pretty tightly -- just keep your gauge loose enough to be drape-y but tight enough that they don't, you know, leak).

CO 22 sts (for a larger one cast on 30, but if you tend to carry things in your pockets keep in mind that the larger size can be a little bulky)

Fisherman's Rib:

Row 1: k1p1 all the way across.

Row 2: Sl1, p1, *K into row below, purl, repeat from *.

Repeat row 2 until you have a square-ish shape. Since this is a pretty boingy stitch it's a little hard to tell. Estimate. It's just a handkerchief.

Bind off, weave in ends. Use to cover nose. Blow. Wipe. Snurgle.

If you're squidgy about immediate contact with nose goo then make a lot and throw them in the washing machine when you run out.

If you're not, however, then you can get away with one or two. When it starts getting full of goo then just take it to the sink, give it a rinse, and wring out. It's damp when you use it again, but the cool water feels really nice on a sore nose.

Friday, September 15, 2006

Back in the days when I first started knitting I fell in love with a certain sweater:

The Rebecca Wrap with Sleeves (golly, I love that name):


Alas, the pattern (PDF) didn't... make a whole lot of sense. I knew how to do fisherman's rib (though not, technically, how it's described in the pattern, but hey -- I'm a rebel. And I'll take my victories where I can get them, thank you).

So! I did what I do whenever work is slow, I figured the pattern out. And now that I look at it, dag, it's simple.

Sizes: 10/12, 14/16
WP: Work pattern (fisherman's rib)

CO 75(79) sts and work in fisherman's rib to 84cm.

WP 33, CO 9(13) sts, WP 33

This is where you work one side at a time.

Since you will be working each side from the outside in, this will be the same for both sides:

WP 28, K2tog, K2tog, WP1
WP back to outside
WP 26, K2tog, K2tog, WP1
WP back to outside
WP 26, K2tog, WP1
WP back to outside
WP 25, K2tog, WP1
WP back to outside
WP 2 rows
WP 26, Inc1, WP1
WP back to outside
WP 27, Inc1, WP1
WP back to outside
WP 27, Inc1, Inc1, WP1
WP back to outside
WP 28, Inc1, Inc1, WP1
WP back to outside
Place stitches onto stitch holder, then repeat for other side!

WP 33, CO 9(13), grab stitches off stitch holder, WP 33

Work another 46(48)cm, then repeat the armhole. Feel smug.

When finished armhole 2, work another 84cm, then bind off. Ideally, your total height will be 222(224) cm.

SLEEVE, make 2

CO 34(38) sts, and work in stockinette, starting with a purl row.

Work to 29(23) cm, end with WS row

K1, Inc1, K to last 2 sts, Inc1, K1
Work 7 rows,
K1, Inc1, K to last 2 sts, Inc1, K1
Work 7 rows,
K1, Inc1, K to last 2 sts, Inc1, K1
Work 7 rows,
K1, Inc1, K to last 2 sts, Inc1, K1
Work 5 rows,
K1, Inc1, K to last 2 sts, Inc1, K1
Work 5 rows,
K1, Inc1, K to last 2 sts, Inc1, K1
Work 5 rows,
K1, Inc1, K to last 2 sts, Inc1, K1
Work 5 rows,
K1, Inc1, K to last 2 sts, Inc1, K1
Work 5 rows,
K1, Inc1, K to last 2 sts, Inc1, K1
Work 5 rows,
K1, Inc1, K to last 2 sts, Inc1, K1
Work 3 rows
K1, Inc1, K to last 2 sts, Inc1, K1
Work 3 rows
K1, Inc1, K to last 2 sts, Inc1, K1
Purl across
K1, Inc1, K to last 2 sts, Inc1, K1
Purl across
K1, Inc1, K to last 2 sts, Inc1, K1
Purl across
K1, Inc1, K to last 2 sts, Inc1, K1
Purl across
K1, Inc1, K to last 2 sts, Inc1, K1
Purl across
K1, Inc1, K to last 2 sts, Inc1, K1
Purl across
K1, Inc1, K to last 2 sts, Inc1, K1
66(74) sts.

When work measures 56cm, BO all sts.

Block, seam, wear!

(Since the green sweater has settled me firmly in denial I will ignore the fact that this sweater will likely ALSO not look good on me).

*UPDATE*
The ssks have been replaced with K2togs.

Wednesday, September 13, 2006