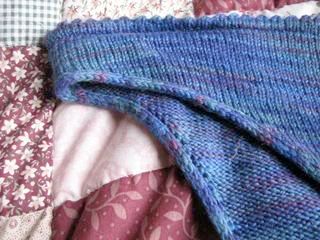
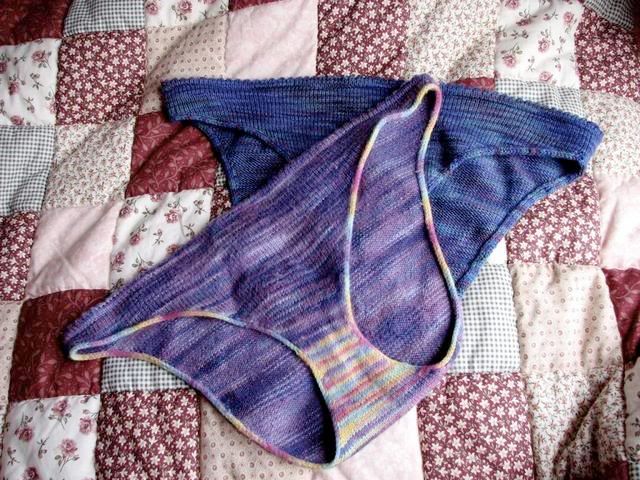
Unders, size XL
“The sock yarn I found there was so lovely that if you had told me that angels flew it down from heaven twice a week to try and make up for poison ivy, I would consider that a reasonable explanation. It is so beautiful and soft that I would not hesitate (except for the nagging concern that people would think I was a raving lunatic) to knit it into underpants.”
I think all knitters have felt yarn that demands to be made into something that goes right on one’s happy place (I don’t think Lorna’s Laces shepherd sport really qualifies, but work with me here). And UNlike Mme Harlot, I have no major qualms with people thinking I’m a raving lunatic, since what with the obsessive knitting and the obsessive contra dancing, I’m probably not too far off anyway.
Plus, I thought that knitted underwear would be awesome anyway. And they are. Remember the feeling you got when you put on your first pair of hand knit socks? It’s like that, but better.
The written pattern’s kind of ugly and sketchy, and it only comes in one size because I have NO IDEA how to change the size on something with so picky a decrease. But hey! It’s free!
If you’re smaller than me, you can use a lighter weight yarn and smaller needles.
Gauge: 6 stitches, 11 rows to the inch
I used:
Needles: size 2 circs for the body and size 3 for the i-cord
Yarn: Lorna's Laces Shepherd Sport, 1 ball and a smidge (around 50 extra yards).
Your mileage will probably vary. Rav link to mine.
Also needed:
- Embroidery needle
- Enough 1/4" elastic to go around your hips. I bought about a yard and that was fine.
- Some thinner elastic for around your legs. 1/8" or so works.
Waist:
Provisionally cast on 220, join, being careful not to twist
Knit 5 rows
6: k2tog, yo to end
knit 5 rows
Knit next row together with cast-on row. Ta da! Picot edge!
Knit in stockinette for an inch.
Back:
Over 110 (half the total) stitches:
IMPORTANT NOTES: All instructions are for right side rows. Wrong side rows are just purled. When you see two dashes (--) it means the right side row is knit plain. It’s good to slip the first stitch of each row for a selvedge (ignore this if you’re binding off stitches at the beginning of the row). This’ll make it easier to pick up stitches for the I-cord edge.
1: b/o 4 either side
2. b/o 1, ssk, k to last 4, k2tog, k next, pass last st over knitted st
3. sl 1, ssk, knit to last 3, k2tog, k1
4. sl 1, ssk, knit to last 3, k2tog, k1
5. sl 1, ssk, knit to last 3, k2tog, k1
6. sl 1, ssk, knit to last 3, k2tog, k1
7. sl 1, ssk, knit to last 3, k2tog, k1
8. sl 1, ssk, knit to last 3, k2tog, k1
9. --
10. sl 1, ssk, knit to last 3, k2tog, k1
11. sl 1, ssk, knit to last 3, k2tog, k1
12. --
13. sl 1, ssk, knit to last 3, k2tog, k1
14. --
15. sl 1, ssk, knit to last 3, k2tog, k1
16. --
17. --
18. sl 1, ssk, knit to last 3, k2tog, k1
19. --
20. --
21. sl 1, ssk, knit to last 3, k2tog, k1
22. --
23. sl 1, ssk, knit to last 3, k2tog, k1
24. --
25. --
26. sl 1, ssk, knit to last 3, k2tog, k1
27. --
28. --
29. sl 1, ssk, knit to last 3, k2tog, k1
30. --
31. --
32. sl 1, ssk, knit to last 3, k2tog, k1
33. --
34. --
35. sl 1, ssk, knit to last 3, k2tog, k1
36. --
37. --
38. sl 1, ssk, knit to last 3, k2tog, k1
39. --
40. --
41. sl 1, ssk, knit to last 3, k2tog, k1
42. --
43. --
44. sl 1, ssk, knit to last 3, k2tog, k1
45. --
46. sl 1, ssk, knit to last 3, k2tog, k1
47. –
48. --
49. sl 1, ssk, knit to last 3, k2tog, k1
50. sl 1, ssk, knit to last 3, k2tog, k1
51. b/o 1, ssk; k to last 4, k2tog, b/o 1
52. b/o 1, ssk; k to last 4, k2tog, b/o 1
53. b/o 1, ssk; k to last 4, k2tog, b/o 1
54. b/o 1, ssk; k to last 4, k2tog, b/o 1
55. b/o 1, ssk; k to last 4, k2tog, b/o 1
56. b/o 1, ssk; k to last 4, k2tog, b/o 1
57. --
58. sl 1, ssk, knit to last 3, k2tog, k1
59. --
60. sl 1, ssk, knit to last 3, k2tog, k1
61. --
62. sl 1, ssk, knit to last 3, k2tog, k1
63. --
64. sl 1, ssk, knit to last 3, k2tog, k1
65. --
66. sl 1, ssk, knit to last 3, k2tog, k1
67. --
68. --
69. --
Front:
1. b/o 3 on both sides
2. b/o 3 on both sides
3. b/o 3 on both sides
4. b/o 3 on both sides
5. b/o 3 on both sides
6. b/o 3 on both sides
7. b/o 3 on both sides
8. b/o 3 on both sides
9. b/o 3 on both sides
10. sl 1, ssk, knit to last 3, k2tog, k1
11. sl 1, ssk, knit to last 3, k2tog, k1
12. sl 1, ssk, knit to last 3, k2tog, k1
13. sl 1, ssk, knit to last 3, k2tog, k1
14. sl 1, ssk, knit to last 3, k2tog, k1
15. sl 1, ssk, knit to last 3, k2tog, k1
16. sl 1, ssk, knit to last 3, k2tog, k1
17. sl 1, ssk, knit to last 3, k2tog, k1
18. sl 1, ssk, knit to last 3, k2tog, k1
19. sl 1, ssk, knit to last 3, k2tog, k1
20. sl 1, ssk, knit to last 3, k2tog, k1
21. sl 1, ssk, knit to last 3, k2tog, k1
22. sl 1, ssk, knit to last 3, k2tog, k1
23. sl 1, ssk, knit to last 3, k2tog, k1
24. sl 1, ssk, knit to last 3, k2tog, k1
25. sl 1, ssk, knit to last 3, k2tog, k1
26. sl 1, ssk, knit to last 3, k2tog, k1
27. sl 1, ssk, knit to last 3, k2tog, k1
28. sl 1, ssk, knit to last 3, k2tog, k1
29. sl 1, ssk, knit to last 3, k2tog, k1
Kitchener two sides together.
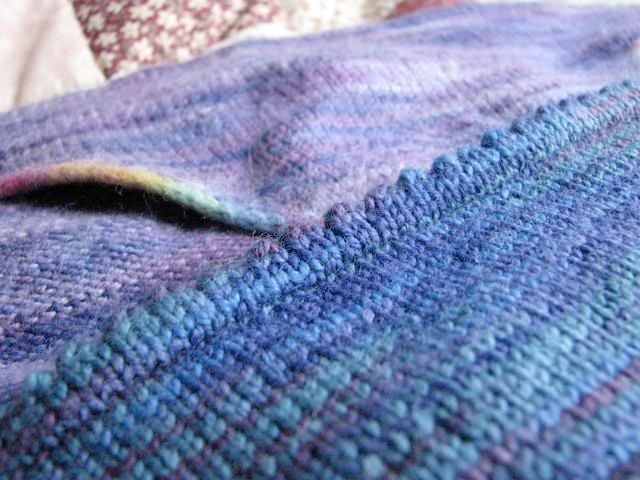
Using size 3 dpns or circular needles, I-cord around the leg holes. Note: be generous when you’re I-cording. Pick up more rather than fewer stitches – I-cord doesn’t stretch.
Use the 1/4” elastic to measure around your hips and mark the end. Don’t stretch the elastic when measuring. Lace through the picot edge, overlap the elastic by about an inch, and sew together, being careful not to twist.
Use the 1/8” elastic to measure around your leg and mark the end. Don’t stretch the elastic when measuring. Lace through the I-cord. This can be tricky. Sorry. Overlap the elastic by about an inch, and sew together, being careful not to twist. Repeat for other leg.
Weave in ends. Put on. Prance around.